Friday, January 31, 2014

Zoe's quilt - sort & design

What do you do with all your little one's baby clothes once they outgrow them?!

Why.... You send them to me! :)

I have worked on many quilts, and one very special birthday quilt that combined clothes, fabric squares with messages, embroidered messages, etc.  I love these projects because they create a wonderful quilt to display and remember all those special items that you just can't throw away / donate.

So when Zoe's mom contacted me.... I was so excited to be given the opportunity's to work on this project!

I received a BIG box on Wednesday and I have to say - it's fun seeing all the pink and ruffles (our boys don't wear pink / ruffles THAT often!).

This quilt will take weeks to sort through, design, stabilize each piece, cut, layout, piece together, and eventually quilt, bind, and send to Zoe - but it will be a labor of love!

Here are a few pictures so far... A disclaimer: they are cell phone pics! 

Tuesday, January 28, 2014

Baby R.'s Nursery!

I have now worked on three custom nursery projects {nope... none of them were for my kiddos - hahahaha!} and I have loved every single one of them!

Baby R. is due in March - and I am SOOOOO excited for our friends to meet their little bundle of joy!  They aren't finding out gender before baby gets here - so we knew we were going to be working with a "neutral" color scheme / design.

We bounced around LOTS of ideas for fabrics / colors / etc. using a Pinterest board I set up specifically for this project.  We were trying to coordinate with a sheet Mama R. found - a cute polka dot that included all the colors she was wanting to use.  Suddenly I had a *lightbulb* moment and remembered one of my favorite fabric lines, Simply Color by V and Co. for Moda.

Even better - I had bought a layer cake {for those who don't live / breathe fabric.... layer cakes are stacks of fabric cut to 10.5" square - and include every fabric in the specific line} of Simply Color a WHILE back, and had never opened it up because I had yet to find the perfect project for it.  Well.... it was great - I had samples of many of the fabrics we were trying to look at online - and suddenly the vision came together!

Fabric for Baby R.'s nursery - includes grey / aqua vines, green / orange zig-zag, and green diamonds from Simply Color by V & Co. for Moda, Michael Miller's Retro Clover, Remix Polka dot by Robert Kaufman, and Cozy Cotton Alphabet flannel by Kaufman

I set up a "registry" in my Etsy Shop that included the specific items Mama & Papa R. had decided they really wanted for the nursery - two changing pad covers, a throw pillow cover, a valance, and a pennant banner.  This allowed friends & family to help them get the custom items they wanted!

The Etsy listings gave a little preview of the fabrics / colors I'd be using for the nursery - since all of the items were custom made after purchase!

We were going for a fun mix-and-match feel - so as the orders started coming in, I had fun playing with fabric combinations and layouts.

Two changing pad covers....
(I LOVE using minky on these... can you imagine how soft it will be on baby's head as they lay there and get their itty bitty diaper changed?!)


A couple burp cloths...


Then my friend Kelly came over and we had fun sewing up a pillow together - we mixed in some minky (the grey / white chevron) - and snuck in some plum vine fabric (because it was just too yummy to leave out!)

Front

Back

A mutual friend LOVES my owl applique design - so she ordered a coordinating onesie - I think this is one of my favorite owl onesies to date... and I have made a TON of them!

Another friend ordered a carseat cover (perfect for the rainy / cold days here in Washington) - it will also work great as a blanket when baby grows out of the infant carrier (we can just take the straps off!)
(we don't have any infant carriers at our house.....)

Then I had to start thinking about what I wanted to sew and give to the mama-to-be at her baby shower.  I was going for cute, hopefully at least one practical thing, and stuff that would continue to pull together the prints / colors.

I decided to do a sling bookshelf.  We LOVE these and have three in our house (all of them are overflowing with books!) - it's a great way to customize something commercial (and the fabric slings are SO much cuter than those nylon primary / pastel colored ones that come with the bookshelf!)

Practical, cute, and something I knew Mama R. had loved when I posted the ones I've made for our house!

Then.... I couldn't resist having a little bit of fun.... so I made a couple plushies! :)
{owl made using a DIYFluffies pattern; Elephant made using a Birch Fabrics tutorial}


Seriously - I NEED to make more of these adorable plushies!

Finally.... I sewed up the valance and pennant banner!


I can't wait to see the nursery all set up!  Mama & Papa R. had me get some extra fabric to use on the inside of a re-purposed piece of furniture, and there were other adorable handmade items given to Mama R. at her baby shower.  Baby R. is going to have a WONDERFUL place to come home to - filled with tons of love.... and handmade adorableness! :)

Oh... and because they are Packers fans, a friend asked me to make a custom onesie.... As a big-time Seahawks fan it was a little tough.... but I still think it turned out adorable!

Projects like this - that give me a little bit of "creative freedom" to mix / match / combine are my favorite - I just love taking a stack of beautiful fabric and making awesome, one-of-a-kind items!

Friday, January 24, 2014

Upcycled - Project Quilting Season 5, Challenge 2 - finished!

I took the opportunity this week to not only be challenged by the actual "rules" / specifications set out for the Upcycled Challenge (read them here) - but I set a personal challenge / goal - to create something FAR outside my "usual" / comfort zone.

My brain is very mathematical.  I have always loved math and science.... I started college studying engineering and graduated with a Bachelor's of Science in Psychology, with minors in mathematics and business.  So.... it makes me giggle sometimes all the time that I spend much of my days creating / sewing / being "artsy".

My quilting is most often very geometric and.... rigid.  I love to experiment with color, but being truly free-form and artistic with my quilting is NOT my strong suit.

So.... this week.... I tried something different.

Not only does my "quilt" meet the various specifications given by the official challenge.... but it is also VERY abstract / free-form / "unfinished" even though it's definitely finished.


I've decided it will be called "Workin'" - because that's what my 3 year old said when he first saw it ("Mommy.... that excavator and dump truck are workin' hard!"

To make the top, I cut up various onesies / sleepers that the kiddos wore as babies.  I also cut up a paper bag and pages of a kids' book {I had to include at least two items that were NOT originally intended for clothing or quilts}.  Oh... and those excavator tracks?  They are cut from a rubber excavator track for a toy (no clue where the other one is.... or the naked excavator.... such is life with two boys!)

I stitched each piece on, and left the bits of string / tails / etc.  I wanted it to feel / look really scrappy and "raw".  Then I added the dump truck and excavator appliques - by spray basting and then stitching them on.  A little while back a friend of mine gave me a bag of fabric she had on hand and didn't have plans for.  The backing is from that bag - and it looks like it was a table runner at some point.  It is just a solid green (It's a wall hanging, so it won't be seen!).

I couldn't decide if I wanted to "finish" it - but after letting it sit for over 24 hours, I just trimmed it up (again, very free-form, not a set shape / size) and then stitched 3/8" from the outside edge to tack everything down that may have been cut in the process.  There is a low loft poly batting between the top and the backing.

Here are a few close-ups of the funky things included in the quilt

Rubber excavator tracks (was SO excited that my sewing machine went through these as if they were plain ol' cotton) - clothes - book pages - paper bag pieces

See the words from the book pages?  Paper bags, lots of loose threads, that darker blue is a cute "polo shirt" onesie.  The camo fabric is from a cute outfit I bought for Colby when we visited a very special little girl for her first birthday in West Virginia!

The orange / blue stripe is from an adorable striped raglan-style onesie the boys wore.  I love that you can see the "carters" info that is printed on the inside of onesies on that dark brown piece off to the right.

It took a LOT of work to get my brain to think this way..... and it's still tough to look at it and LOVE it.... but it is DEFINITELY growing on me.  It's fun, too, to see the little chunks of each outfit / book page I used.... they spark wonderful memories.

This is now pinned up on the wall in Colby's bedroom - he is SO into construction / trucks.... and it goes great with his new big boy bed, etc.

For more posts about this project, click on the topics below:
Brainstorming
Beginning Stages

Wednesday, January 22, 2014

{itty bitty squares} - a finished project

A little while back, I shared a sneak peek at a project I was working on.  With a simple sketch and some pretty fabrics, I started sewing.  I cut strips that were 1.5" wide and sewed them together, cut them apart, and sewed them together again - working toward 1" squares in a mix-and-match patchwork design.

But I wasn't loving it.

You see, this project is a special one.  A friend of mine's mom is fighting breast cancer - - - she is currently undergoing chemo and this project is for her.  So this couldn't just be "okay".... I needed to LOVE it.

So I thought a bit more about my fabric choices.... and pulled a few more pinks.  Setting aside the strips I had already pieced together, I got to work again.

The finished item is a quilted tote bag.  I used a variety of lighter pink-based fabrics for most of the bag - and used a darker pink ribbon fabric to piece together a heart shape for the front.


I quilted simple squiggly horizontal lines through the body of the outside of the bag.

And since I still loved the fabrics I originally pulled, I thought I'd line the bag with something other than pink :)


The bag is definitely fully reversible.  The body of the "outside" of the bag (the patchwork / quilted part) is lined with flannel to give it a little more body and to allow me to quilt it with a bit more texture.

Oh... and those original 1" squares?  Instead of setting them aside for "another day" - I used them to make a quilted coffee sleeve.  My mom has had a few friends go through chemo, and they say their fingers get REALLY temperature sensitive - which makes it hard to drink hot coffee / tea, or cold sodas, etc.  I thought a coffee sleeve might be a nice little addition to this care package!


Wishing my friend's mom all the strength and perseverance it takes to fight this nasty cancer... and hoping they feel surrounded by the love of family, friends, and complete strangers.

Tuesday, January 21, 2014

PQ Challenge 2 - the beginning stages

This week's "upcycled" challenge has my creative wheels spinning!

Immediately I knew I wanted to use onesies / clothes / blankets / etc. from when my kiddos were young..... but I had to shift my thinking a bit to fit within the challenge specifications.

I had a few custom orders that needed to be shipped ASAP so that they could get to the customers by the end of the month.... so those came first.  And my mind kept thinking about this challenge.

Last night, at 11:30pm, I finished up the last stitch on my final outstanding paid order.  While I have a few to invoice, and details to figure out on a few more, this gives me at least a few days of a "break" to work on Project Quilting {oh... and taxes.... pesky taxes that need to be finished by the end of the month!  Ahhhh!}

This is about as far as I got yesterday...

Yep.... those are boxes and crates and a few more boxes of the kiddos' baby clothes.  My project this week will not be a traditional onesie / t-shirt memory quilt {though I hope to make one of those some day... and have a customer order for one coming up - yay!} - but since everything used needs to have a previous life.... and obviously I have *just a bit* to work with in all these boxes, I figured it was a great source for the main materials to make my item.

Next up... I need to sort through all these clothes and pull blues, browns / tans, yellows, oranges, some black..... and sort them by size so they can be MUCH more organized than they are right now (yep, using this challenge as an opportunity to check THAT off the to-do list, too!)

Interested in joining in on the Project Quilting fun?  Get more information here:
Project QUILTING Season 5

Sunday, January 19, 2014

Brainstorming - PQ Challenge 2

Wahoo!  Today is a GOOD day!

This morning, the second challenge in Project Quilting Season 5 was posted over at Persimon Dreams.  Click here to read through it all {I'll summarize it below, with my brainstorming / commentary, too!} - - -This week's theme is "upcycling".

But.... before I get to that.... there are a few more exciting things to note.

Each week, every person who completes the PQ challenge is entered into a drawing to win some fabulous prizes.  Last week there were over 40 completions / entries!  ...... and I WON a prize!  I get to pick out a pattern from Studio Cherie - which is awesome - but I am struggling to decide which pattern I want!  Decisions, decisions.

Oh.... and then this evening...... The Seahawks won and we are headed to the SUPERBOWL!  So excited!  We watched the game with a BUNCH of friends and it was LOUD - the perfect way to watch such an eventful game!

My munchkins ready to go cheer on the Seahawks!

Needless to say..... I haven't done much sewing this weekend.  I spent most of yesterday at a baby shower {will post about that soon - LOTS of handmade items given to the mama-to-be that I've been DYING to share but couldn't because they're gifts}..... and today was filled with family and football.

Anyway..... back to Project Quilting!

Here's a snippit of this week's challenge
"The front, back, borders, binding and embellishments should all be made from materials that have had a previous life as something else.  Your project must include at least 2 materials that were never intended for use in a quilt or clothing."

I had hoped an upcycling challenge was going to come up.  It had been discussed before the season started - and I knew if it did my goal would be to make something from a selection of our kiddos' favorite onesies / blankets / etc. from when they were younger.

But then I read the challenge.  And in all honesty..... I was a little peeved.  Hahahahaha.  That second part - including at least 2 materials that were never intended for use in a quilt or clothing - was really throwing me for a loop.  I had pictured something soft and snuggly.  Something my kiddos could have in bed with them every night.  How are they going to snuggle with something that isn't meant to be used in a quilt or clothing?????

This is what Project Quilting is all about.  Challenging your preconceived notions.  Creating this week.  Not necessarily something you've been "drawing up" in your head for months that happens to fit the rules.  Not likely something you would have dreamed up without the challenge.  I mean.... it's called a challenge for a reason.

But.... my time is precious.  I do not want to spend a bunch of that precious time making something that I will never use - that will fit the rules but not my life / home / kiddos / business.  My goal is to sew with a purpose.  At first I didn't see it...... but then I realized that is definitely still possible.  Shift my thinking.

I read the challenge post again.  I thought about the reason I was so excited about upcycling (using my kiddos' old clothes).  I thought about my kiddos and what they love.  I did some Zumba.  I kept thinking.  I vented to my husband.  Then things started clicking.  Yes..... things that are fabric but not "meant for" quilting / clothing (like towels, curtains, etc.) could work... and that would still be a challenge.  But now I was gaining momentum.... and ready to attack this challenge head-on..... and those things just feel "comfortable" to me.

The brainstorming process is all still in my head.... and will likely continue to change / transform..... but I'm getting excited.  I know I will be "shopping" from under our beds (where the kids' clothes are in storage boxes), in toy bins, probably in the "shop" area of our garage...... I'm hoping to start that "shopping" process tomorrow - and maybe do a little drawing {remember though.... I draw like a 3 year old!}.... and some more "shopping"....

I just said last week I wanted to make sure I felt like I was stepping outside of my comfort zone of geometric / really planned out and calculated quilting.  It's not how my brain works..... but that doesn't mean I can't give it a try.

So I will challenge myself.  And enjoy the process.  And who knows what the end result will be (though I have a feeling it will be far from soft and snuggly).... but I promise to do my best to have fun!

But first... I have some WORK to do.  Yes..... customers before fun sewing!  *fingers crossed* for a productive night!


Wednesday, January 15, 2014

Don't say BOM on a plane....

.... but you'll definitely hear it a ton around our home! :)

I came across another BOM that I think I'm going to participate in... or at least keep an eye on and make blocks if I like them! It's hosted by Aurifil - and each month one of their designers will share a block of their choice.  An added bonus?  Each month you complete the block and share it in their flickr group you are entered to win Aurifil thread!  I have heard amazing things about this thread - so I'd LOVE the chance to give it a try!

I think the concept is to make a scrappy quilt from all the Designer of the Month blocks.... but when I saw the first block I thought it would be perfect for my sewing room.

January's block is "Chez Claire" by Brigitte Heitland of Zen Chic.  I have LOVED the Zen Chic patterns I have seen.... and her block this month is made to look like thread spools. {see why I thought it would be perfect in my sewing studio!?}

So I jumped in!  I joined the flickr group - and Sunday night I pulled fabrics and got to work.

I wanted my block to coordinate with the super sweet ironing board cover I bought at the end of the year from City Chic Country Mouse on Etsy.  It is made from a Riley Blake fabric that uses tans / greys / pinks / reds / with little hints of green and aqua.  Scarlett, my sewing machine {yes, she has a name!}, has a red face plate - perfect!

I pulled Riley Blake's Verona Gray Flowers for the background, along with Michael Miller's red / white pindot, and green mini geometric print from Jo-Ann.  Then of course I had to use some of my light pink ribbon fabric - after walking two Susan G. Komen 3-day walks (60 miles each in San Francisco and Seattle) last year - as I have a part of my sewing space decorated with all my gear!  I loved that the Daisy Grid from Kari Beyer's Dream a Little Dream for In the Beginning fabrics pulled all the colors together and echoed some of the patterns in my ironing board cover - yay!

Here's my block pieced together - it's really 4 small blocks in one.  You can see my ironing board behind it!

I couldn't decide which layout I liked better.  I would usually default to the greens being diagonal from one another, and the red / pink being on the other diagonal (the layout above) - but because the red / darker green fabrics stood out more than the light pink ribbon fabric / light green fabric.... I decided to swap them around and see what I thought.

 I liked that now the light / dark squares were more equally spaced - it didn't feel as "lopsided" to me.

So I sewed up those final seams... and here is my January block:

As I said.... I think I will make it into a wall hanging for my sewing room.  Maybe a border around the outside.... other little blocks?  I'm not sure!  But for now, it's a 12.5" block!  

Tuesday, January 14, 2014

Itty bitty squares

After sewing with a friend all morning, nap time came and I figured it was time to work on one of my "to-do list" items.

I'm working on a special project... and I won't say much about it.... but here are a few peek photos


Fabric info: black / white dots, turquoise floral, and croquet tile orange from Jo-Ann Fabrics /// pink floral has no selvage info but was purchased from someone in our Fabric Crafters U Bid It Destash group on Facebook /// pink ribbon fabric from Quilting Treasures.

A few fun notes:

~ yes, I realize I need to buy some graph paper.... obviously that one was "drawn" quickly - - - I often make graph paper in Excel.... but the real stuff would probably be a nice treat!

~ in case you can't read it..... my scribble note says finished = 1", squares 1.5"  Yup.... those are tiny squares.... and lots of them!

~ the friend who came over to sew with me today giggled as I pulled fabrics for this project.  "Shopping in your own home."  Yep!


Now.... back to sewing tiny squares - and a few triangles - though Little Man #2 has woken up from a VERY short nap, so not sure how much I'll get done until after the kiddos go to bed tonight!

Hope you enjoyed the peek!

Monday, January 13, 2014

ALYOF January 2014 - finished!

As it was my first month of A Lovely Year of Finishes, I made my January goal fairly small / simple - making a stop sign pillow for little man #1's new "big boy bed".

Can you tell he likes it?  I went to take pictures and he said "Are you going to take the picture of the pillow with me??"  Umm.... how could I resist?!

The pillow is about 15.5" across.  I used applique for the letters.. and after consulting some pictures (and a quick chat with the hubby) determined the white band around the outside was necessary.  That took a little more time / effort - but I think it was worth it!

I didn't have enough stuffing (since I've been making some adorable plushies recently!) - but I did have an older throw pillow that we no longer use.... so I cut that sucker open and used the filling from it.  I didn't have *quite* as much as I wanted.... but it works!  


I purchased the red blender fabric from Marcia's Crafty Sewing and Quilting (it's not solid red... though it looks that way in the photos!).  The white is actually muslin (yuck, so thin... but it's what I hand and I'm not allowed to buy fabric until I make 62 more items.... so I made do).  I used two layers of the muslin (to help it be a *little* less see-through) for both the applique and the border.  


So excited to have sewn something for one of my little dudes - I'm thinking next month's goal will be something for Little Man #2 :)

This month's ALYOF is closed (goals have to be posted / linked up by the 7th) - but you can join in next month!
My Button

Sunday, January 12, 2014

Sew with me Sunday - my applique process

While I don't think I'll be able to post a "Sew with me" every Sunday... I think it will be fun to share little tips and tricks on occasion.  While I am in no way an expert seamstress - I definitely have learned / improved a ton over the last three years.  I guess that's what happens when you do something just about every.single.day. {or at least you can hope that you'd improve / learn!}

I plan on sharing little "tutorials", peeks into my sewing process, and favorite patterns / designers - but I'd love to share things YOU want to learn about.... so whether you've never sewn a stitch in your life... or maybe you have a sewing machine that is almost always sitting in a closet.... or you sew off and on but still have questions.... or maybe you're a quilter who is scared of sewing things like clothes.. or maybe you also sew just about every day but love to see how others work {yup, that's me!} - I'd LOVE to shed some light on the things I've learned / the processes I have adopted!  I'd love to hear what YOU'D love to read / learn about - just leave a comment!

-----------------------------------------------------

One of the top questions I get about my sewing process is about applique.  I have been doing appliqued onesies / shirts since Eggo in the Oven started - and understood the process *for the most part* when I started, but have definitely improved my precision sewing / applique skills over the last 3 years!

The process of applique is pretty simple - thanks to awesome products like Heat 'n Bond Lite iron-on adhesive {or other iron-on adhesives... I just use HNB}.  This post is in no way sponsored by Heat 'n Bond - these are my opinions and a product I have used for years and LOVE!

You can purchase Heat 'n Bond Lite by the bolt / cut from a bolt or in smaller pre-cut packages.  The bolts tend to be on the shelves with other interfacing - often behind or near the cutting counter at the fabric store.

photos from fabric.com

The packages are usually found in the notions aisle.  If you are planning on sewing your applique (not just cutting it out and ironing it on) - make sure you get the Lite version.  There is also Heat 'n Bond Ultra - which is a no-sew iron-on adhesive..... and you do NOT want to throw anything with that on it through your sewing machine!

The iron-on adhesive has two sides - one side is textured, the other side is a smooth paper.  

Gather up your supplies - - - For this project I needed a onesie (not pictured), the various fabrics for each part of my design, my templates (hand-drawn this time around, but you can also use images from your computer, etc.), Heat n' Bond Lite, scissors, and the right needle.  As I said, I was working on a onesie applique and I have found using a 75/11 embroidery needle to be the most consistent tool for the job!  
A little note about using images from your computer to create appliques: Make sure you print them out as a mirror image, or flip them horizontally before printing (or after you cut them out of the paper).  Otherwise your applique design will be "flipped" the opposite direction of the picture on your computer - as we will work with the BACK side of the fabric.  If this is still confusing, I have plans for a post about applique letters in the VERY near future... so hang tight until then.

For the purpose of this post, I worked on an owl applique onesie - one of my first designs and one that I have made so many times I think I could do it in my sleep {or maybe I have done it in my sleep.... during those exhausted "I-have-a-new-baby" months?!}  Anyway.... if you want to see examples of this design - check out my "Animals" onesie / shirt applique album on Facebook.

As you can see in this picture - I used scraps for much of my applique, and I pre-cut my HNB to the general sizes I needed.  A note: all my fabric is pre-washed in free & clear detergent.  This is highly recommended to reduce bleeding / shrinking when the finished item is washed.... and to allow the iron-on adhesive to stick.

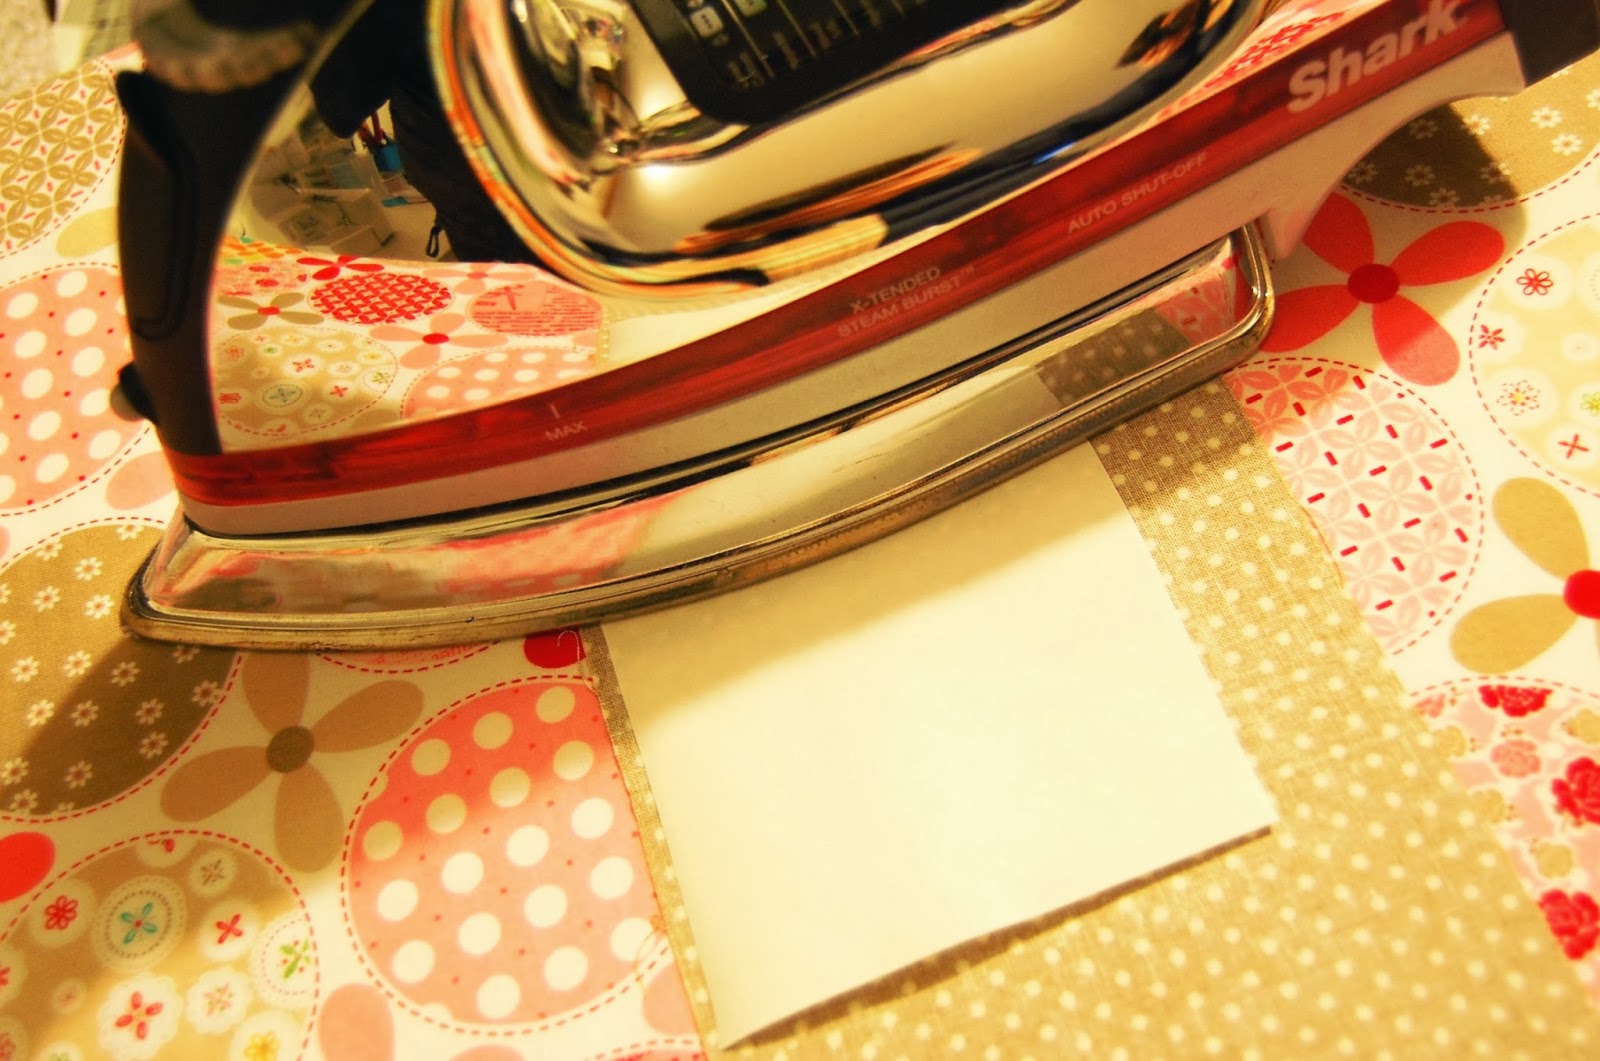
Set your iron to a pretty low, no-steam setting.  For mine it's the wool / silk setting.  Avoid overheating the HNB or it will melt into the fabric and will not allow for adhesion to the item you are trying to stick your applique to!

Now, flip over all your fabrics so that they are wrong-side up.  Lay the HNB Lite paper side UP on the fabric (so the textured side is touching the back side of the fabric) - and iron!

Make sure your fabric piece is bigger than the piece of HNB - otherwise you'll be ironing that sticky stuff onto your ironing board!

Allow this to cool (it will cool quickly!)  Now take your template and trace it onto the paper side of the HNB.  Remember, if you printed something from your computer and did NOT flip it horizontally / print it as a mirror image, you want to flip it over to trace it - so that the printed side is DOWN.

 Here are all my pieces traced and ready to be cut! (there are two wings... they're just stacked... actually I cheat and only trace it once, then put the pieces of fabric right sides together and cut out two layers at once - it produces two pieces that are the mirror image of one another!)

Cut out all of your pieces, following the lines you just traced.  Are you starting to see the cute lil' owl?!

Next you are going to peel the paper off your pieces so that you can expose the other side of the adhesive and iron them onto your item.  If your paper doesn't peel off easily (both the paper and the adhesive are peeling up) - have no fear! - just take it over to your iron, and warm it up a bit more - you probably just didn't iron it *quite* long enough.  Ironing it a little more should get that HNB to adhere.

For multi-part appliques I often iron down the pieces in stages (rather than setting them all on the item and ironing them all down at once) - because little pieces can wiggle / move.  For these owl appliques I often position and iron down the body first, then add the wings / eyes / beak.  Again, your iron should be on a low setting, no steam.

Next, I lay out the rest of the applique pieces - adjusting to get them *just right*

And then I iron them down!  If you are new to applique, don't hesitate to do each piece on its own.  I often do that, and I will just "tack" each piece down (iron it very shortly) so that they are stuck before I move on to the next piece (reduces wiggling / pieces "jumping"!).  Then once all the pieces are down, I'll iron it once more to make sure all of the pieces are fully adhered.  I recommend picking up and setting down your iron - rather than pushing it back and forth across the pieces - less chance of wiggling and more exact placement!

So cute!  Now.... it's time to sew!

Sewing can be tough.  When I first started, my lines weren't as straight / consistent, and I hadn't mastered the art of starting / stopping at corners quite like I am able to today - but that's okay!  This is a handmade item, perfection is NOT expected... and imperfections???  I like to embrace them and call them "character"!

Most of my appliques are sewn on using a zigzag stitch.  The width / length of that stitch really depends on the item / piece I'm stitching.  If you want a pretty consistent, classic zigzag, keep a 2:1 ratio between stitch width and length (like shown below - stitch width is 3.0, length is 1.5)

You'll want to experiment with your settings and decide what width / length stitch you want to use.  For this owl, I use a 3.0 / 0.8 for the black of the eyes, 3.0 / 1.5 for the white and beak, and 3.5 / 1.5 for the wings / body.  Why?  Because I've sewn about a million of these suckers, and those are the ratios I like!  But there is NO right width / length!  Some people prefer a more dense satin stitch (I don't... it takes tons of time, and thread, and shows imperfections MUCH more!) - but try some out and see what you prefer!

Now.... start sewing!  For this project, I already had white thread in my machine, so I started with the white of the eyes.  You want to stitch so that the zig-zag runs right along the outside edge of the piece you are sewing.  I always stitch so that the outside edge is the right-most point of the zigzag - it's habit!  Don't worry if some of your stitches land just outside the piece, and some just inside - it will be fine.  Remember, you have that HNB helping keep the item on - and little bits of fraying, etc., are totally normal with handmade items!  Remember - imperfections add character! 

Then I changed to green thread and did the beak / body / wings.  Lastly I did the black of the eyes (though I didn't take a picture of that).  If you are sewing a onesie, take your time at sharp corners (like the points of the wings).  The onesie material is stretchy and can easily get caught in your machine.  Try not to pull the onesie - try to let the sewing machine do the work for you.

Clip your threads (front and back) - and admire your work!
See how you don't really see most of my stitching - that is because I don't use a dense stitch.  The denser your stitch, the more you'll see it (which is fine - and often looks really nice as it really outlines each piece) - I just love the softness of allowing the fabrics to define the shapes!

If you made it through all of that - YAY!  Have questions?  Feedback?  Other tips / tricks?  Comment below - I LOVE to hear from you!

I have another onesie to make this week that will include appliqued letters - I'll make sure to take pictures of that process which will help better explain the "mirror image" concept, too!